This project showcases a series of prototypes I built in Unreal Engine 5 as a way of learning the engine through hands-on experimentation. My goal was to re-imagine a few classic arcade games, each with a unique twist, while steadily building up my skills in using UE5’s editor and tools. This included learning blueprint scripting and physics to implementing local multiplayer, particle effects, and level blockouts.
Each prototype took an existing retro game and asked: What twist could make this game feel fresh and unique?
- Asteroids became a zero-gravity challenge in controlling your momentum.
- Warlords was reborn as a 3v1 king-of-the-hill party game.
- Missile Command turned into a flashy cooperative experience.
This collection represents both a technical exercise in learning Unreal Engine and a design-centric exploration of how simple changes to mechanics can create entirely new gameplay experiences.
Game 1: Asteroids
Twist: The player can only move using the recoil from their gun!
For this first Unreal Engine project, I decided to recreate an age-old classic: Asteroids! I changed up the formula a bit in this project by making the player into a simple astronaut who is lost in space with nothing but a gun. The player will be moved backwards whenever they fire their gun due to its recoil in a zero-gravity environment, and this will act as the player’s only method of propulsion. This project had me learning a lot about UE5’s basics; Including simple blueprint programming, actors, collision detection, and physics.
View a simple analysis and breakdown of the game Asteroids by clicking here!
Game 2: Warlords
Twist: The four players now compete in a 3v1 King-of-the-Hill style setup!
For my next project, I wanted to dive into some of UE5’s systems for simple local multiplayer. I decided to recreate one of my favorite games from the Atari: Warlords! The twist this time was a new game mode that we called, “Siege Mode.” You see, I would often get ganged up on when playing this game with my friends – so I wanted to create a game mode where ganging up on one player was its central premise! Each round, a player will be selected as the “King,” with the other three players acting as “Invaders.” The King will be in charge of defending a small castle located in the middle of the screen, and the King will be able to rotate fully around their castle. If the castle’s Core is destroyed by the ball, then the King loses, and the round ends. The invaders meanwhile must defend their four Camps, located on the outskirts of the palisade in each of the four corners; Once each of the four Camps are destroyed, the King wins, and the round ends. A new player will be selected to start the next round as King. This project had me learning more about Unreal Engine’s input system, UI elements, and the intricacies of local multiplayer.
View a simple analysis and breakdown of the game Warlords by clicking here!
Game 3: Missile Command
Twist: Missile Command is now co-op, with players having to coordinate missile launches!
For my final project, I wanted to focus on making a game that felt complete and refined. I decided to go with recreating a classic game that I felt could really be improved with some pizazz, so I picked Missile Command! For our twist, we made Missile Command into a two-player co-op game. Each player has control over a set of different missile silos located on different sides of the board, and the players will have to coordinate their missile launches in order to defend the cities. For this project, I focused on making the game look as pretty as possible: I experimented a lot with UE’s particle system to create some nice explosion and missile exhaust effects, and I even added a pixelation filter to the game to really make it feel retro!
View a simple analysis and breakdown of the game Missile Command by clicking here!
Extra: UE5 Level Blockout Tools!
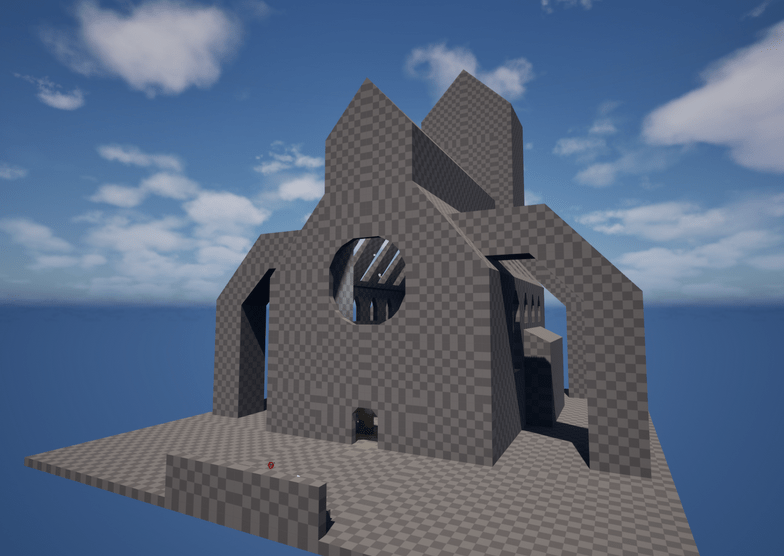
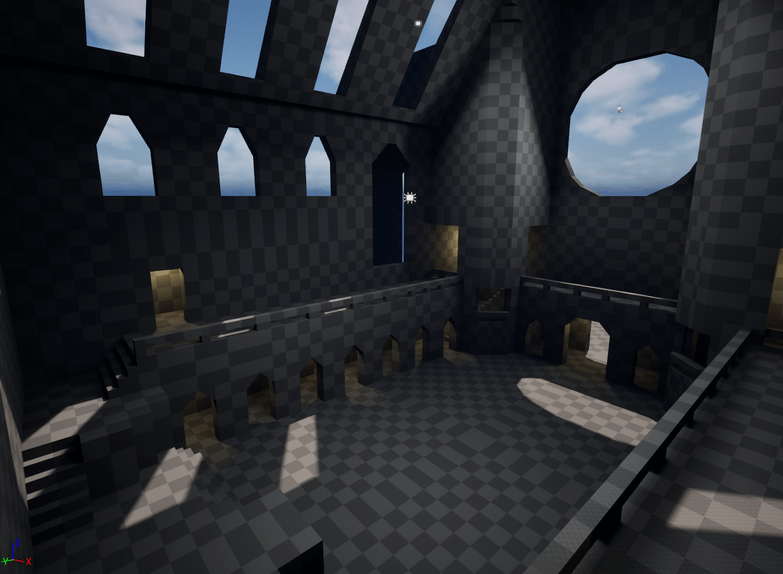
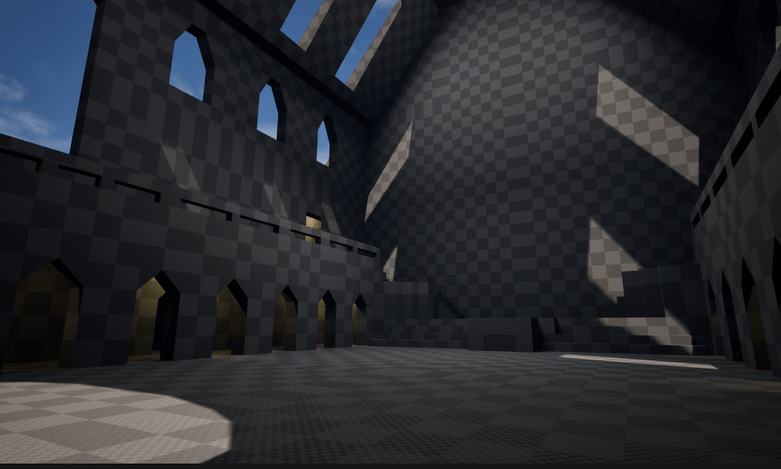
After completing the previous three projects, I decided to spend a final couple of days learning a lot about one of the tools available in Unreal Engine. Specifically, I wanted to learn more about some of the level prototyping systems it had available. To this end, I decided to dive a bit deeper on Unreal Engine’s CubeGrid system, which would allow me to perform rapid grayboxing.
You can access Unreal’s CubeGrid system by entering “Modeling Mode,” and clicking on the “CubeGrid” button. Using the CubeGrid system, you can do a lot of actions that will allow you to rapidly prototype a level.
The controls for the CubeGrid system are really simple. The main control is to click and drag on the grid that appears within the level; Then you can press on “Pull” to create terrain in the area, or “Push” to delete terrain in that area.
After playing around with some of the system’s base actions, I went and learned its different shortcuts which would allow me to make a level even quicker. The following is a list of the shortcuts available for the Cube Grid Tool:
- To Push/Pull terrain, the user can use the hotkeys E/Q, or simply hold Ctrl and drag out the selected area.
- The user can also resize the grid they are pushing/pulling on by a power of 2. The user can do this by holding down Ctrl, and pressing E or Q.
- This function is really useful for creating more finely detailed aspects in a graybox layout, such as cover in a shooter game.
- The user is also able to toggle a “Corner Mode,” which allows the player to pull/push on the corners of their selection area – this allows the user to create ramps.
- There are also a lot of advanced options that allows the user to adjust the base size of the blocks they use for their grayboxing – so that they can ensure the grayboxing measurements coincide with the measurements of their character and functions like jumping.
Using the knowledge I accrued, I created this cathedral level. This was a fantastic test of the CubeGrid system – by knowing all of its options and shortcuts, I was able to create this massive level layout within just 3 hours!